What is it that shapes the videos we watch every day? It is video encoding. In the world of digital media, video encoding plays a crucial role. But what exactly is video encoding, and why is it so important in 2024?
Video encoding converts raw video footage into a digital format to easily store, transmit, and play back on various devices. Think of it as translating a video into a language that different gadgets and platforms can understand. Without encoding, our videos would be too large and unwieldy to share efficiently or to watch smoothly.
In 2024, video encoding is more significant than ever. With the presence of content across every platform, like YouTube, Netflix, and social media, encoding impacts not only the quality of your video but also how quickly it loads and how well it performs on different devices. Encoding also determines the balance between video quality and file size, ensuring that your videos look great, load quickly, and take up minimal storage space.
In this guide, let’s understand the essentials of video encoding by breaking it down, explore the tools and techniques available today, and provide tips to help you optimize your videos for the best possible experience in 2024. So, whether you are a content creator, a tech enthusiast, or a curious cat about how videos work behind the scenes, this guide will help you understand and navigate the world of video encoding.
Understanding Video Encoding

To get a solid grasp on video encoding, it is helpful to start with the meaning of video encoding and build from there.
Video encoding, also known as video compression, is like taking a video file and putting it into a smaller, more manageable package. Raw video files are often huge because they contain a lot of data, including all the details of every frame. Encoding reduces the size of these files, so they are easier to store and share while still keeping the video looking good.
To understand video encoding better, let’s go over some key terminologies:
Codec: Short for “compressor-decompressor,” a codec is a tool that compresses (reduces) the video file size and then decompresses it for playback. Common codecs include H.264 and H.265.
Container: This is a file format that holds the video, audio, and metadata (like subtitles or chapters). Popular containers include MP4, AVI, and MKV.
Bit Rate: This refers to the amount of data processed per second of video. Higher bit rates usually mean better quality but larger file sizes.
Resolution: This is the number of pixels in each dimension of the video (e.g., 1920×1080 for Full HD). Higher resolution means more detail but also larger files.
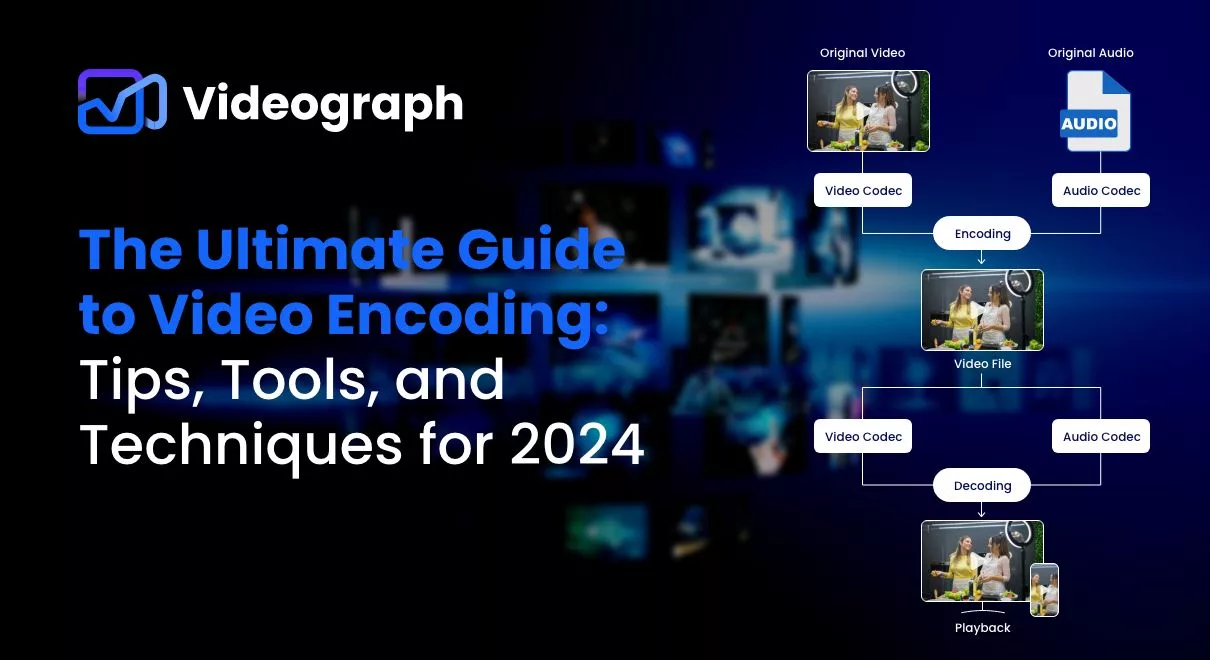
How Video Encoding Works
Compression: The encoder takes the raw video and reduces its size by removing redundant data. For example, if a part of the video does not change much between frames, the encoder can simplify that part to save space.
Encoding: The video data is then transformed into a specific format using a codec. This is where the file gets its new, smaller size and format.
Decoding: When you play the video, the decoder reverses the encoding process to turn the compressed file back into a viewable video.
Think of encoding as packing a suitcase for a trip. You carefully fold and compress the items (data) so they fit well. When you reach your destination and need to use them (play the video), you unpack them and get everything back in order.
Understanding these basics will help you appreciate how video encoding affects your videos, from the quality you see on screen to the file size and how well it performs on different devices.
Popular Video Codecs and Formats
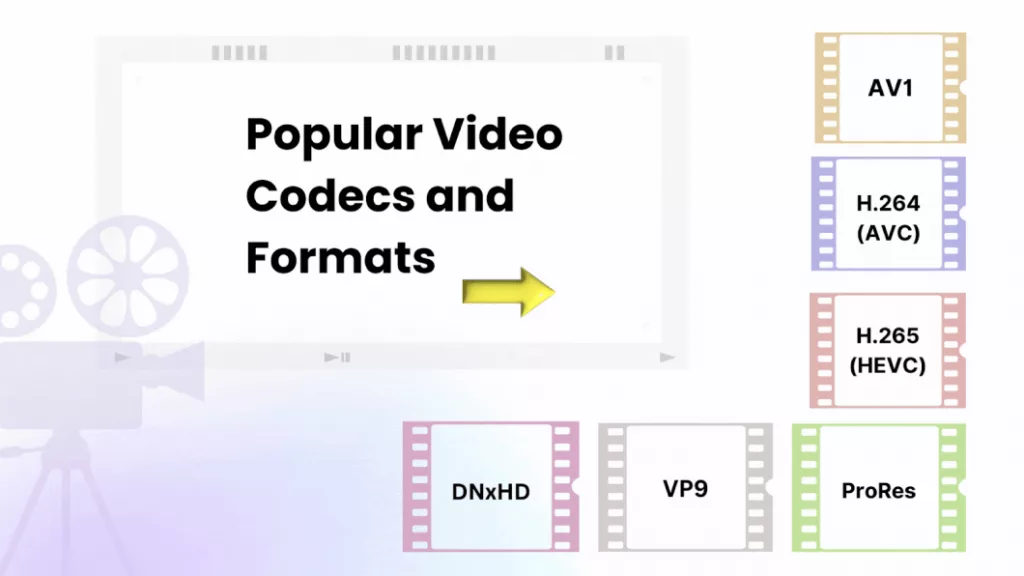
These tools are key players in how videos are compressed, stored, and played back.
H.264 (AVC): H.264 is also known as AVC (Advanced Video Coding). It is one of the most widely used video codecs. It is versatile and effective for many uses.
- H.264 strikes a good balance between video quality and file size. It is commonly used for everything from streaming videos on YouTube to Blu-ray discs.
- It offers high-quality video at relatively small file sizes, therefore it is ideal for streaming and online sharing.
- H.264 is found in almost every corner of the video world- whether you are watching a movie, a TV show, or even video chat on Zoom.
H.265 (HEVC): H.265, or HEVC (High-Efficiency Video Coding), is the successor to H.264 and aims to offer even better compression.
- HEVC provides similar or better video quality as H.264 but with about half the file size. This is especially useful for high-definition and 4K content, where large file sizes can be a challenge.
- HEVC is increasingly used for streaming high-definition content on platforms like Netflix and for 4K Ultra HD Blu-rays.
- While HEVC is powerful, not all devices or software support it yet. This can sometimes cause playback issues or the need for additional software.
VP9: A video codec developed by Google as a free and open alternative to HEVC.
- VP9 is often used for streaming high-definition videos on platforms like YouTube.
- It is open-source, which means it can be used without licensing fees, and it provides good quality at lower bit rates.
AV1: AV1 is an emerging video codec.
- AV1 is designed to outperform HEVC and VP9 in terms of compression efficiency, providing even better video quality at lower file sizes.
- It is also open-source and royalty-free, which means no licensing fees. This makes it attractive for future-proofing video content.
- While still in the early stages of adoption, AV1 is gaining traction in new streaming platforms and devices.
Other Formats: Aside from the major codecs mentioned, there are other formats worth noting:
- ProRes: Often used in professional video editing and production. It maintains high quality but results in larger files.
- DNxHD: Developed by Avid for high-definition video editing. Like ProRes, it is used in professional workflows where quality is critical.
Choosing the Right Codec and Format
With so many video codecs and formats available, choosing the right one can feel overwhelming. Understanding a few elements can help you make the best choice for your needs.
Factors to Consider
When selecting a codec or format, here are some important things to think about:
- Quality vs. File Size: Different codecs offer different balances between video quality and file size. For example, HEVC (H.265) provides better quality at a smaller size compared to H.264, but it may not be as widely supported on older devices. Choose a codec that gives you the quality you need without making the file too large.
- Compatibility: Ensure that the codec and format you choose are compatible with the systems and platforms where your video will be played. For instance, if you are uploading videos to YouTube, H.264 is a safe bet. For newer platforms or devices, AV1 might be a good choice, but make sure it is supported.
- Performance: Some codecs require more processing power to encode and decode. If you are working with high-resolution videos or need to encode videos quickly, make sure your hardware or software can handle the codec efficiently.
Use Case Scenarios
Different scenarios call for different codecs and formats.
- Streaming: For streaming platforms like YouTube or Netflix, H.264 is commonly used due to its good balance of quality and file size. For higher efficiency, you might choose HEVC (H.265) or VP9, especially for 4K content.
- High-Definition Content: If you are creating high-definition content and need the best quality, HEVC (H.265) or AV1 can be excellent choices. They offer higher compression efficiency, which is crucial for maintaining quality in large files.
- Professional Editing: For professional video editing and production, ProRes or DNxHD are preferred. These formats preserve high quality and are designed for editing, even though they produce larger files.
- Archival: When archiving videos for long-term storage, you might prioritize quality over file size. Formats like ProRes or even uncompressed formats are suitable for this purpose, as they retain the highest possible quality.
Video Encoding Settings and Parameters
When you are ready to encode your video, there are several settings and parameters you will need to adjust to get the best results.
Resolution and Aspect Ratio
- Resolution: This is the number of pixels that make up the video image. Common resolutions include 480p (standard definition), 720p (HD), 1080p (Full HD), and 4K (Ultra HD). Higher resolutions mean more detail, but they also result in larger files. Choose a resolution based on where and how your video will be viewed. For example, HD is usually sufficient for online content, while 4K is better for high-quality displays.
- Aspect Ratio: This is the ratio of the width to the height of your video. Common aspect ratios include 16:9 (widescreen), 4:3 (standard), and 1:1 (square). The aspect ratio should match the platform where the video will be shown. For example, most YouTube videos use a 16:9 aspect ratio, while Instagram videos often use a 1:1 ratio or 9:16 ratio for stories.
Bit Rate and Quality
- Bit Rate: This determines how much data is used to represent each second of video. Higher bit rates usually mean better quality but also larger file sizes. Lower bit rates reduce file size but can lead to poorer quality. You can pick between constant bit rate (CBR), which keeps the bit rate consistent, or variable bit rate (VBR), which adjusts the bit rate based on the complexity of the video. VBR can be more efficient, offering good quality with smaller file sizes.
- Quality: Many encoding tools offer a quality setting that adjusts the balance between file size and video quality. If you are aiming for high quality, set the quality level higher. If file size is a bigger concern, you might need to lower the quality setting.
Frame Rate
- Frame Rate: This is the number of frames (images) displayed per second in your video. Common frame rates include 24 fps (frames per second) for movies, 30 fps for TV and online videos, and 60 fps for smooth, high-action content. Choose a frame rate based on the type of video you are creating and the look you want to achieve. Higher frame rates can make fast-moving scenes look smoother but result in larger file sizes.
Audio Settings
- Sample Rate: This is the number of audio samples taken per second. Common sample rates include 44.1 kHz (used for CDs) and 48 kHz (used for video). Higher sample rates provide improved audio quality but can increase file size.
- Bit Depth: This refers to the amount of data used to represent each audio sample. Common bit depths are 16-bit (CD quality) and 24-bit (studio quality). Higher bit depth improves audio quality but also increases file size.
- Codec: Just like with video, audio codecs compress audio data to make files smaller. Common audio codecs include AAC (Advanced Audio Coding) and MP3. Choose a codec that offers a good balance between quality and file size.
Tools for Video Encoding
Software Options
HandBrake: HandBrake is a free, open-source tool that is great for both beginners and advanced users. It supports a range of formats and codecs and offers a straightforward interface. It allows you to adjust resolution, frame rate, and bit rate, among other settings. It also provides presets for different devices and platforms, making it easier to get started.
Pros: User-friendly, versatile, and regularly updated.
Cons: Learning curve for advanced features.
Adobe Media Encoder: Adobe Media Encoder is a professional tool that integrates well with other Adobe products like Premiere Pro and After Effects. It is ideal for those who need advanced features and high-quality output. It offers extensive format support, detailed encoding settings, and batch processing for multiple files.
Pros: Powerful, highly customizable, and great for professional workflows.
Cons: It is a paid tool, which may be overkill for casual users.
FFmpeg: FFmpeg is an incredibly powerful and flexible command-line tool. It is used by many for its extensive capabilities. FFmpeg supports a wide range of codecs and formats and allows for complex encoding tasks through command-line instructions.
Pros: Highly customizable and supports nearly every format and codec.
Cons: It requires knowledge of command-line usage, which can be intimidating for beginners.
Online Encoders
Clipchamp: Clipchamp is a web-based video editor and encoder that is easy to use and does not require software installation. It provides basic encoding options and tools for editing, trimming, and compressing videos.
Pros: Convenient, user-friendly, and accessible from any device with an internet connection.
Cons: Limited features compared to desktop software, and video quality may vary.
Online-Convert: Online-Convert offers a range of conversion and encoding options directly in your browser. It supports various file formats and codecs. Allows you to convert video files, adjust settings like resolution and bit rate, and apply basic edits.
Pros: Easy to use and does not require software installation.
Cons: Upload and download times can be slower, and file size limits may apply.
Hardware Encoders
Elgato Game Capture HD60 S+: This hardware encoder is popular among gamers and streamers for capturing and encoding gameplay footage in real-time. It provides high-quality encoding with minimal impact on system performance.
Pros: Excellent for live streaming and capturing high-quality video with low latency.
Cons: Primarily designed for gaming and streaming, which may limit its use for other types of video projects.
Blackmagic Design UltraStudio Mini Recorder: This hardware encoder is used in professional video production environments for high-quality video capture and encoding. Supports various input formats and high-quality encoding suitable for broadcast and film production.
Pros: Superior quality and reliable performance for professional use.
Cons: Expensive and overkill for casual or amateur projects.
Best Practices for Video Encoding in 2024
To really get the most out of video encoding, you need to follow some best practices to help you optimize your videos for various platforms and ensure they look and perform their best.
Optimizing for Different Platforms
- Social Media: Each social media platform has its own preferred video formats and specifications. For example, Instagram videos often use square (1:1) or vertical (9:16) aspect ratios, while YouTube prefers widescreen (16:9). Use the platform’s recommended settings to ensure your videos display correctly and look their best. Most social media platforms also have file size limits, so keep your videos optimized for faster loading and playback.
- Streaming Services: Platforms like Netflix or Hulu often require specific formats and resolutions. Streaming services typically prefer high-quality formats like H.264 or HEVC (H.265) for smoother playback. If you are uploading content to a streaming service, check their guidelines for resolution, bit rate, and file size to meet their requirements.
- Web Videos: For videos embedded on websites, use widely supported formats like MP4 with H.264 encoding. This ensures compatibility across different browsers and devices. Also, consider the video’s loading time and optimize file size to improve the user experience on your website.
Maintaining Quality
- Check Your Settings: Use the highest quality settings that your file size and platform compatibility will allow. Test your videos using different settings to find a balance between quality and file size. If you are working with high-definition or 4K content, ensure that your settings maintain the clarity and detail of your original footage.
- Preview Before Publishing: Always preview your encoded video to check for quality issues before publishing or sharing. Look for problems like pixelation, color distortion, or audio sync issues. Making small adjustments to your encoding settings can often fix these problems.
File Size Management
- Compress Wisely: While reducing file size is important, over-compressing can lead to a noticeable drop in quality. Use tools and settings that allow you to find the right balance. For example, using variable bit rate (VBR) encoding can help optimize file size without sacrificing quality.
- Use Efficient Codecs: Choosing modern, efficient codecs like HEVC (H.265) or AV1 can help reduce file sizes while maintaining good video quality. These codecs are designed to offer better compression than older formats like H.264, making them a great choice for high-quality, smaller files.
Compression Techniques
- Advanced Compression: Consider using advanced compression techniques for more control over video quality and file size. These might include fine-tuning bit rates, adjusting resolution, or using multi-pass encoding. Multi-pass encoding processes the video multiple times to improve quality and reduce file size.
- Optimize Audio: Do not forget about audio! Lowering the audio bit rate or sample rate can also help reduce file size without significantly impacting the overall quality of the video. Choose an audio codec that balances quality and compression, like AAC.
Troubleshooting Common Issues

You might encounter some issues during video encoding. Here is how to tackle common problems:
Quality Loss: Sometimes, videos may lose quality after encoding. This can be due to excessive compression or incorrect settings.
Check your bit rate and resolution settings. If you are compressing too much, try increasing the bit rate or adjusting the quality settings. Also, ensure you are using a codec that supports high-quality output. Preview your video before finalizing to spot any quality issues.
Playback Problems: Videos might not play smoothly or may have trouble starting. This can happen due to encoding settings that are incompatible with certain devices or software.
Ensure you use a widely supported codec and container format, like H.264 with an MP4 container. Check the settings to ensure compatibility with the devices or platforms where the video will be played. If playback issues persist, try re-encoding the video with different settings or a different codec.
Compatibility Issues: Your video might not play correctly on some devices or platforms because of format or codec incompatibility.
Research the recommended formats and codecs for the platforms where you plan to upload or share your video. For example, YouTube and most modern browsers support MP4 files with H.264 encoding. If you are working with less common formats, consider converting your video to a more widely supported format using tools like HandBrake or FFmpeg.
Case Studies and Examples
Seeing how video encoding practices apply in real-world scenarios can help you better understand the concepts and make informed decisions for your own projects.
Streaming Service Optimization
Scenario: A new streaming platform wants to ensure smooth playback and high-quality video for its users.
Strategy: The platform uses HEVC (H.265) for its 4K content to balance high video quality with reduced file sizes. They also implement adaptive bitrate streaming to adjust the quality of the video as per viewer’s internet speed. This helps prevent buffering and ensures a smooth viewing experience even on slower connections.
Outcome: Users experience high-definition video with minimal buffering, and the platform can efficiently manage its storage and bandwidth.
Future Trends in Video Encoding
- Emerging technologies like the AV1 codec and 8K video encoding are shaping the future of video technology.
- Moreover, machine learning and AI are being integrated into video encoding, optimizing quality and efficiency through AI-powered encoding and content-aware compression.
Conclusion
As we conclude this guide to video encoding, it is important to emphasize the key points. Video encoding involves the conversion of raw video data into a compressed format, which is essential for managing file sizes and ensuring compatibility with various platforms and devices. Choosing the right codec and format is crucial for balancing quality and file size, so consider your specific needs for streaming, social media, or professional editing to make the best selection.
Moreover, adjusting key settings such as resolution, bit rate, frame rate, and audio quality significantly impacts the final output of your video. It is important to optimize videos for different platforms, maintain quality while managing file sizes, and use efficient compression techniques to achieve the best results.
Additionally, staying updated with emerging technologies like the AV1 codec and AI-powered encoding will help keep your video projects innovative and cutting-edge. Finally, do not hesitate to experiment with multiple settings and tools to find what works for your specific needs, as each video project may require a unique approach.